
If your ClickUp workspace is starting to feel cluttered, the issue may not be your tasks. More often, it is the way those tasks are being displayed.
One common problem found during a workflow audit is the overuse of personal or user-specific views. They usually begin as a practical workaround. One team member creates a view that helps them manage their work, shares it with others, and over time the workspace fills up with views that are only partly useful to everyone else.
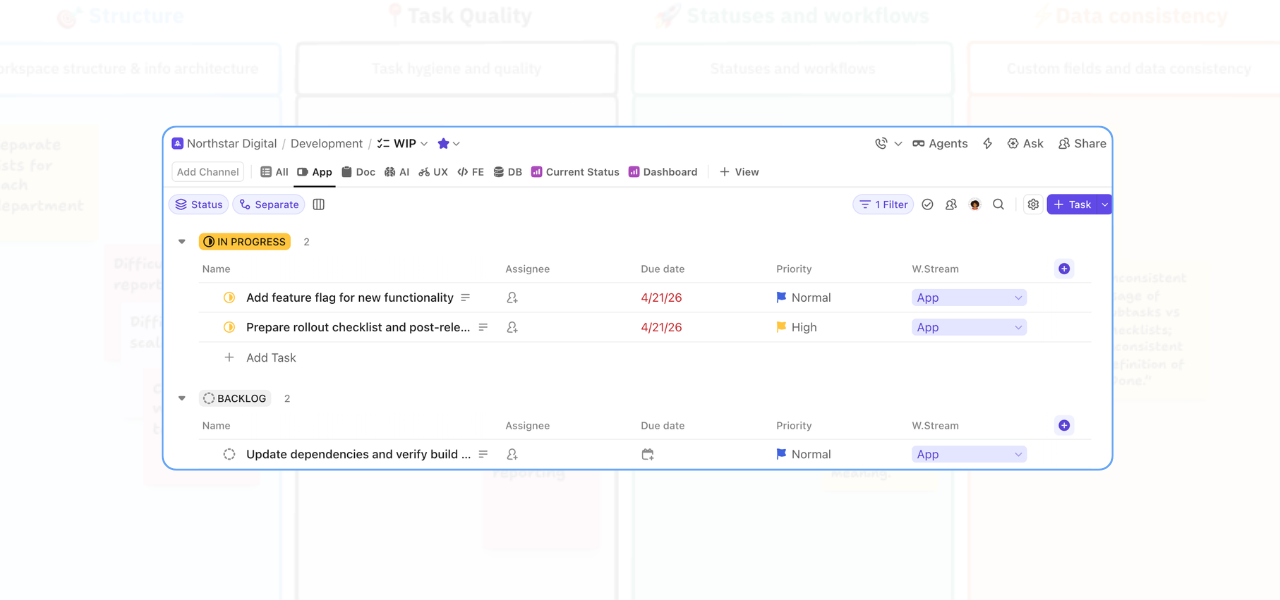
In this video I show you how I created role-specific views in ClickUp, and it made a big difference.
By organising views around functions or work streams instead of individual people, teams can reduce clutter, improve visibility, and make it easier for everyone to find the work relevant to them.
What are role-specific views in ClickUp?
Role-specific views in ClickUp are views created for a particular team function, discipline, or work stream rather than for one individual user.
For example, instead of building and sharing separate personal views, you might create views for:
- app
- doc
- AI
- UX
- front end
- database
Each view is filtered so the relevant team members can go straight to the work that applies to their role.
This is especially useful when multiple teams are working from one main list, but each function needs a cleaner way to see only what matters to them.
Why personal views can create workspace clutter
Personal views are not always a problem on their own. The issue usually appears when they are shared widely across the team.
At that point, the workspace can become harder to navigate because people are looking at:
- views that were built around somebody else’s way of working
- inconsistent naming conventions
- unnecessary duplication
- extra tabs and filters that make the setup feel more complicated than it needs to be
This creates friction. People spend more time clicking around, second-guessing where they should be, or missing work that is technically in the system but not visible in the right way.
How role-specific views in ClickUp improve visibility
A cleaner approach is to create structured views based on work stream or role.
In the setup shown in this video, separate list views are created for each work stream. Each one uses a filter to show only the relevant tasks, making it easier for each part of the team to focus on the right workload.
This approach helps teams:
- reduce visual clutter in ClickUp
- improve task visibility by role
- create a more consistent workspace structure
- make onboarding easier for new team members
- reduce reliance on personal workarounds
It is a small structural change, but it has a direct impact on how usable the workspace feels day to day.
How to create role-specific views in ClickUp
Creating role-specific views in ClickUp is fairly straightforward.
1. Start from your main list
If your tasks have already been consolidated into one main list, you can create views from that central location.
2. Add a new List view
Create a new List view for each work stream or team function.
Examples might include:
- app
- doc
- AI
- UX
- front end
- DB
3. Filter by work stream
Apply a filter so the view only shows tasks where the work stream matches that role.
This keeps the view tightly focused and relevant.
4. Show subtasks separately
This is an important step that teams often miss.
If subtasks are collapsed, filtered views may not show all relevant work. Setting subtasks to display separately allows the filter to pick them up properly.
That means the role-specific view reflects the actual workload more accurately.
5. Save frequently used views to favourites
Once the views are set up, users can add the most relevant ones to their favourites. This makes it faster to jump straight to the right view without extra navigation.
Why showing subtasks separately matters
If you are using role-specific views in ClickUp, showing subtasks separately is one of the most important configuration choices.
Without it, a filtered view can look correct while still hiding part of the work. That leads to confusion, missed tasks, and less trust in the system.
When subtasks are displayed separately, the filtered view becomes much more reliable.
This is a good example of why small technical setup details matter in ClickUp. The structure may look fine on the surface, but if the filtering is not working properly, the team experience still breaks down.
When to use role-specific views in ClickUp
Role-specific views work well when:
- several functions are working from the same list
- teams need a simpler way to see only their own work
- the workspace has become cluttered with shared personal views
- different disciplines need visibility without duplicating tasks
- you want a cleaner structure that scales more easily as the team grows
If that sounds familiar, this is usually a strong sign that your current view structure needs attention.
Final thoughts
A ClickUp workspace should make work easier to find, not harder to interpret.
Using role-specific views in ClickUp is a practical way to reduce clutter, improve visibility, and give each team a clearer way to work from the same system.
It is not a dramatic rebuild. But it is exactly the kind of structural improvement that makes a workspace feel cleaner, faster, and more useful.
If your team is struggling with cluttered views, inconsistent setup, or poor visibility across work streams, this is a smart place to start.
If you want help reviewing your current setup or implementing changes from a workflow audit, Book a call. I can help turn those recommendations into a system your team will actually use.
FAQs
What are role-specific views in ClickUp?
Role-specific views in ClickUp are filtered views designed for a particular function, team, or work stream, helping users see the tasks relevant to their role.
How do role-specific views reduce clutter in ClickUp?
They reduce clutter by replacing widely shared personal views with a clearer structure based on work streams or team functions.
Should subtasks be shown separately in ClickUp views?
Yes. Showing subtasks separately helps filters include relevant subtask work, making the view more accurate and useful.
Related Content
Walk Through a ClickUp Workspace Audit with Me
Improve Clarity in ClickUp: 2 Practical Ways to Reduce Workspace Confusion
How to Improve ClickUp Task Hygiene by Simplifying Nested Subtasks
How to Use Custom Fields in ClickUp to Improve Data Consistency and Reporting
How to Build a ClickUp Dashboard for Better Project Visibility
How to Manage Private and Public Docs in ClickUp Without Creating a Messy Workspace